A blogger often finds the need to attach a Microsoft Office document file or PDF to a blog post. Embedding is the perfect solution to this but Blogger, being a free platform doesn’t provide its user with a lot of direct options here as opposed to the several other platforms that come with a price tag. Blogger wouldn't let you directly embed a PDF, DOC, XLS or PPT file and so we'll be looking at an indirect way that can get the job done really nicely and yes, it'd still technically be called embedding. A simple blogging trick would even let you embed music players to your blogger blog . PDF, DOC, XLS and PPT are among the most used containers of information and hence are used almost everywhere a computer table is found. Such a file might also sometime be needed to embed in a blog post.

Instead of writing the whole extensive document as text in your post, you could embed that document file on your blog which will not only make it look neat but will also be easy for the reader to read. So let's take a look at how to embed these files to your Blogger blog. In order to embed almost anything to Blogger, the HTML iframe tag is your best friend. If it is a file you want to embed from some other website or online source, all you have to do is add the html code in the right place. iframe basically allows you to display a web page within a web page, using this property of its' you can easily embed a Microsoft Office/PDF file in your blog post. Here is how you can do that:-
- Go to the HTML section of your post.
- Locate the point in your post where you want your file to be embedded.
- Add the following iframe code
<iframe src="yourURLhere" width="570" height="400" ></iframe>
Replace yourURLhere with the web address of the file you want to embed in your post. You can set the height and width of the frame as required.
What if your file isn't available online?
You can make it available online by using Google Drive by uploading that required file from your computer to Google Drive and then use the above mentioned method to embed it to your post. Here's what you'll need to do:-
- Go to This link and Sign-in with your Google account
- Upload your file to Google drive
- Set the permissions
The permissions here refer to the file access which is by-default private on Google Drive i.e. only the uploader has the access to a file. You'll be needing to change that for sure.
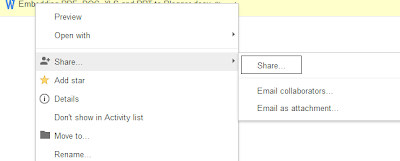
- Right click on the uploaded file and select Share

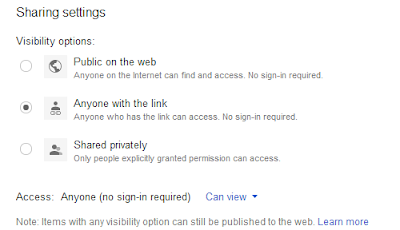
A dialogue box will appear with the file URL and a list of users who have access to the file. Click on Change in the Who has access panel

- Select ‘Anyone with the link’ from the dialogue box and hit Save

Now use that URL of the file and embed it to your blogger post anywhere
you desire. Below is a DOC embedded onto the blog post directly from
Google Drive.
So how did it go? We're sure you were easily able to embed the several
types of files to your Blogger blog using the steps mentioned. However,
if you've got any question or confusion in mind, drop it below in the
comments section.
Watch the video to Learn More....

 Popular
 Tags
Tags


acchi post hai....
ReplyDelete