Welcome

Latest Updates

What Is Jump Break And How To Add Jump Break In A Blog Post ?

Posted By: Unknown - Monday, February 02, 2015
When i first started blogging i really didn't know what a jump break is and how to use it in my blog post. There are some small things that are not noticed by begineer blogger but are really important, jump break is one of them. Even pro blogger don't take time to write about this. If you know this then its cool but if you don't then you must learn to add jump break to your blog post. Adding jump break is like giving small summary or introduction of your post on the homepage. So in todays tutorial i will talk about jump break, its important and how to add jump break in a blog post. Its really important that you add jump break in each and every post or article you publish on your blog.


blogger jump break


What Is Jump Break ?


Jump break is a simple feature in blogger. When ever you add Jump break in your blog post the paragraph or text before the jump break is shown on home page of your blog or website. Its like showing introduction of your tutorial or article on the homepage of your website. So in order to view the complete post users have to click on read more link. This keep your home page clean and helps to generate more page views.


Importance Of Jump Break


  • Keeps the Homepage more cleaner  and gives user friendly look.
  • Helps to generate more page views
  • Allow you to fit more post on the homepage of your blog.
  • Gives the users snak peak of your blog post.


How To Add Jump Break In Blog Post ?


Before learning to add jump break in your blog post always keep few things in mind. Add Jump break after writing a small introduction paragraph on what your post is about and add relevant image to it as you can see on my homepage. Adding jump break is really easy just follow simple steps listed below.


1. Write your blog post and keep your cursor where you want to add jump break. Then click on Insert Jump Break as shown below.


blogger jump break


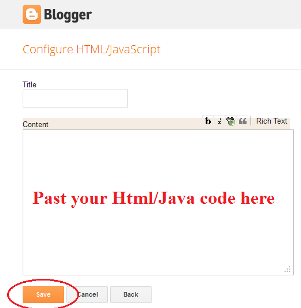
2. After adding the jump break a dotted line will appear (shown in below picture). The text and images above this dotted line will be displayed on your homepage.


jump break for blogger


3. Done! So wasn't that so simple ?


Watch the video to learn more....


Facebook running truck widget for blogger or website

Posted By: Unknown - Tuesday, January 27, 2015

Hi Friends Today I made a very attractive social widget it’s very Simple widget and it’s very easy to add in blogger as title name you have understood this widget is for Facebook  you can also see widget demo below in upper on Task Bar .


Now we will see how to add this on blogger or website.


Step by step do this


  •        Sign in –  in your blogger account


  •        Select your Blog in which blog you want to Add Widget


  •        Go to Layout Option


  •        In Layout option  there is a Add Gadget Option Select this     (see in image)


  •        After select Add Gadget a popup window will be open  ( Add Gadget window ) (see in image)


  •        Now select “HTML/JavaScript” Gadget   Now add below  HTML Script in Content Box.


<!--http://realpctrick.blogspot.com/--> <div style="position: fixed; z-index: 65535; left: 0px; bottom: -3px; width:100%;"> <marquee><a href="http://www.facebook.com/your facebook page address" target="blank"> <abbr title="Follow us at Facebook"><img src="https://blogger.googleusercontent.com/img/b/R29vZ2xl/AVvXsEgrdoltaVXrGG0vrImv66V2lHXDteVegxNuvS35Xn1sa8g7x0kKKZmKNAPjN8OolIdvEyBC0vEP1tJ8KyXBvZuWosaCS4CciBh18SpfZIRq64tk_kuN9tyhBlOH82sJbXcnL4wLuNqIISwv/s69/I1.png"/> </abbr> </a> </marquee> </div>


Note- 


Please replace the you facebook page address with your facebook page address


Example. My facebook page address is allrealpctricks so I change like this


https://www.facebook.com/allrealpctricks


  •     Now finally press save button and you have done it.


Watch the video to learn more


Add Dynamic and cool rotate effect in Blog or Website

Posted By: Unknown - Monday, January 26, 2015

Friends on mobile or Tablets menu you may have seen Rotate Menu effect it’s look nice when you  select menu all mobile Display change in Rotate effect that Rotate you may seen on this page when you get in on this page (If you are using Mozilla Firefox or Google Chrome Browser).


This Classic 360 Degree Rotate effect makes your blog or webpage cool and stylish effective.
Add Rotated Effect in you blog or website. For add in your blog you need add a small script in your blog it’s very easy to add in blogger Just follow below Step for create Rotate effect in blog.


Follow Below steps:-


  • Sign in –  in your blogger account


  • Select your Blog in which blog you want to Add Widget.


  • Go to Layout Option.


  •  In Layout option  there is a Add Gadget Option Select this (see below demo image)


  • After select Add Gadget a popup window will be open  ( Add Gadget window )


  •  Now select “HTML/JavaScript” Gadget .(See below demo image)


  • Now add below HTML Script in Content Box.(See below demo image)                           


  • Copy and paste the code given below in HTML/JavaScript Content box


<style> @-moz-keyframes roll { 100% { -moz-transform: rotate(360deg); } } @-o-keyframes roll { 100% { -o-transform: rotate(360deg); } } @-webkit-keyframes roll { 100% { -webkit-transform: rotate(360deg); } } body{ -moz-animation-name: roll; -moz-animation-duration: 4s; -moz-animation-iteration-count: 1; -o-animation-name: roll; -o-animation-duration: 4s; -o-animation-iteration-count: 1; -webkit-animation-name: roll; -webkit-animation-duration: 4s; -webkit-animation-iteration-count: 1; } </style>


  • Now press Save Arrangement Button Now you blog is ready for Rotate Effect.


Note:- This Rotate Effect work in Mozilla firefox or Google chrome Browser only. Thanks I Hope you like this post


Hey !!!!! Any Problem for using this trick , then Watch our video.


Notepad Tricks

Other Tricks

Copyright © 2014 ALL REAL PC TRICKS™

Designed by ALL REAL PC TRICKS